Logging with MicroBitLog
If your use case for the micro:bit v2 includes logging data from sensors and other event sources, then you may be tempted to use the MicroBitFileSystem or KeyValueStorage to store your log data for later retrieval from the micro:bit file system. However, new to micro:bit v2, there is an API designed specifically for logging: MicroBitLog. Use of this API allows you to store data in a table-like format, containing rows of field-value pairs, providing a handy web interface to view your results data by loading your micro:bit v2’s file system from a PC.
A video from the BBC showing how you can access log data from the browser.
In this guide, we will set up a basic logging configuration for the micro:bit’s temperature sensor, and allow this logging data to be accessed through a PC browser through observing the micro:bit v2’s mounted file system.
Creating the Logging Filesystem
To create the logging filesystem, you can simply get the instance of MicroBitLog from your global MicroBit instance, and perform a logging operation. Note that the logger class creates the filesystem on a lazy-load basis, so until you perform the first filesystem modifying operation, it will not be initialised on flash. You should only have one instance of MicroBitLog running at once, as it uses a class instance mutex to manage thread safety, so don’t try and initialise and use an additional instance outside of MicroBit.
Take care when using this API in tandem with the MicroBitFileSystem or KeyValueStorage. The log file system is currently forced to be loaded from start address 0, and takes up the subsequent 6144 bytes of space (2048 bytes for MICROBIT_LOG_METADATA, and 4096 bytes for MICROBIT_LOG_JOURNAL). Placing any other file systems within this range will result in undefined behaviour and (probably) horrific errors.
#include <MicroBit.h>
#include <MicroBitLog.h>

MicroBit uBit;

int main()
{
    //Initialise microbit API.
    uBit.init();

    //Get the logger, do some logging stuff.
    uBit.log.setVisibility(true);
    ...
}
Adding Log Entries
Once we have a reference to the logger, we can begin adding log entries from any input sources we might have. For this example, we will import data from the micro:bit’s onboard temperature sensor every 10 seconds.
//Only keep logging while we have space left.
while (!uBit.log.isFull()) {

    //Create a row with temperature data.
    uBit.log.beginRow();
    uBit.log.logData("temperature", uBit.thermometer.getTemperature());
    uBit.log.endRow();

    //Wait a while.
    uBit.sleep(10 * 1000);
}
With this sort of data, it’s probably useful to have a timestamp attached to it. To achieve this, we can modify our logging code to use a handy method provided by the logger which sets a timestamp to be attached to each log row. When enabling timestamping, we also need to choose the granularity of the attached timestamps. The available time stamp granularities are:
- None (no timestamp attached)
- Milliseconds
- Seconds
- Minutes
- Hours
- Days
We can modify our code to enable timestamps before we start logging data like so:
//Set log entry timestamp type to log the seconds passed.
uBit.log.setTimeStamp(TimeStampFormat::Seconds);

//Only keep logging while we have space left.
while (!uBit.log.isFull()) {
    ...
}
Accessing Log Data
Now that we’ve logged data to the micro:bit’s flash, what is remaining is to access this from the PC side. First, we should make sure that the HTML file that allows you to access your data is set to be visible from the micro:bit code. To make the HTML viewer visible from the mounted partition, you can run the following from your micro:bit code.
uBit.log.setVisibility(true);
Once this is done, you should be able to open MY_DATA.html from the mounted partition on your PC, and view the logged data through the browser.
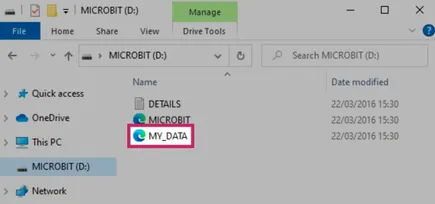
Image Attribution: (c) British Broadcasting Corporation, 2022
You can also access the log data from code, by using the readData() method in tandem with the getDataLength() method. This allows you to read from either the HTML header, HTML header with data, or the raw CSV data alone, with a given offset and length. An example would be something like the following:
//Get the length of the CSV data to read out, make a buffer for it.
uint32_t csvLen = uBit.log.getDataLength(DataFormat::CSV);
void* csvData = malloc(csvLen);

//Read this data from the logger with offset 0.
//The last parameter of this call should always be the result of getDataLength(DataFormat::...),
//equivalent to the type of data you're receiving.
int result = uBit.log.readData(csvData, 0, csvLen, DataFormat::CSV, csvLen);
if (result != DEVICE_OK) {
    //Something bad happened!
    //...
}